Digital Learning Update

The Technology Team has been hard at work getting things prepared to support digital learning and 1:1 student technology access starting this fall.  You may remember that this process is being rolled out over the course of four years.  Here is the proposed overview for those four years:


Year 1
Year 2
Year 3
Year 4
Grades
2016-2017
2017-2018
2018-2019
2019-2020
PreK-2
One iPad cart per grade
2 iPad carts per grade
Model TBD
Model TBD
3-5
3rd Grade
1:1 iPad
4th Grade
1:1 TBD
5th Grade
1:1 Chromebook
(Assess and refine)
6-8
6th & 7th Grade
1:1 Chromebook
8th Grade
1:1 Chromebook
(Assess and refine)
(Assess and refine)
9-12
9th Grade
1:1 Chromebook
10th Grade
1:1 Chromebook
11th Grade
1:1 Chromebook
12th Grade
1:1 Chromebook

If your grade level is involved in Year 1 of the project (3rd grade, 6th grade, 7th grade, 9th grade*), you will be registering to attend our Digital Learning Boot Camp this summer.  Teachers attending the Digital Learning Boot Camp will learn the tools they need to start off on the right foot teaching 21st century students in a digitally-enhanced classroom.  Each of the three days will include work time individually and in teams to help you adequately prepare for the 2016-2017 school year and beyond.  Teachers will be compensated at the curriculum writing rate and will receive continuing education credits as well.

There are three different options for attending:
  • Option 1: July 11, 12, 13, 8 am - 3 pm, MS Media Center (times may change)
  • Option 2: August 15, 16, 17, 8 am - 3 pm, MS Media Center (times may change)
  • Option 3: Online cohort (self-paced learning from July 11 through August 17)

If you are part of the Year 1 cohort, you will receive more detailed information, including directions for registering, soon.  Until then, please pencil in the dates on your calendar that work best for you!

*Since high school teachers generally teach mixed grade classes, we will divide teachers into different groups (Year 1, Year 2, etc.) based on the percentage of 9th graders in their courses.

Moving Photos from Mobile Devices

Mobile devices can be pretty handy!  The camera alone on iPads and cell phones can be extremely valuable for teaching and learning.  But what do you do with all of the photos you take?  Maybe you've emailed them to yourself.  But guess what?  There's an easier way!

Did you know that you can store photos and videos in Google Drive?  And that Drive has unlimited storage space?

Follow the directions below to move photos and videos from your devices to Drive so they are safe and much more usable!

Moving Photos to Google Drive

What's On Your Website?

When I first started teaching, I didn’t have a website and I’m guessing many of my colleagues didn’t either.  Since then, I’ve built a handful for my various jobs and roles.  I get the same question a lot: what should be included in a teacher’s website?
The problem is, there is no one-size-fits-all answer.  Every teacher’s classroom is different, so every teacher’s website is different.  That said, I have come to believe that there are a few basics that every teacher or classroom website should include as well as several “extras” you can add if you are interested in have time.
Before I jump into the “must haves” and “nice to haves,” there are a few other things I ask teachers to keep in mind regarding their website.  First, what do you need it to do?  What’s your purpose?  Are you simply communicating with parents? Will your students be accessing class materials on your site? Are you trying to advertise or promote your program?  All of the answers to these questions help determine what and how much needs to be on your site.
Second, how much time do you have to devote to updating your website?  It's a pet peeve of mine to see a teacher’s website that’s horribly out of date.  If I’m still seeing pictures of Halloween in April, we have a problem.  I recommend keeping the bulk of the website static so it doesn’t need to be changed often.  You can incorporate something like a blog or Twitter feed to keep viewers up to date on what’s going on in your classroom.
Third, what other methods of communication do you already use?  This one particularly comes into play at the elementary level.  Many of my K-5 friends still compile and print a paper newsletter each week (and some do one for the month AND one for each week).  Then they also feel the need to update the exact same information on their website each week, resulting in them working twice as hard.  Consider uploading the digital copy of your paper newsletter so parents can see it there rather than retyping the information (or better yet, scrap the paper newsletter altogether!).
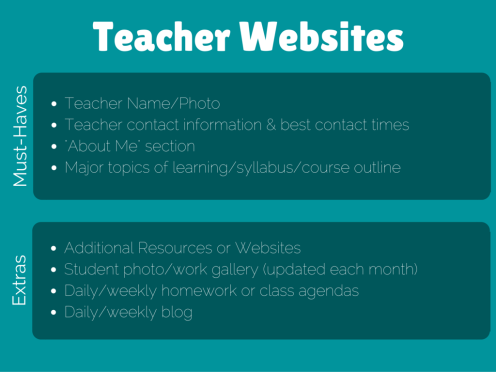
Okay, so what should you have on your site?  The most basic info is your name and photo.  Parents should be able to easily tell whose website they’re on and the photo confirms they’re in the right place (you’d be surprised how many parents know their child’s teacher by either name or face but not both, particularly parents with multiple children).
Next, include your contact information and how to best reach you.  This would likely include your email address and/or phone number.  It can also be helpful to let parents know the best times of day to reach you (if including your phone number) or when you check emails.  Even if you check messages more frequently, it’s helpful for parents to know that you will check at 8 am and 3 pm every day (for example).  It will keep them from wondering when you’ll get back to them.  One note: I never included my phone number on my website because I didn’t want parents calling during the day.  My first job is teaching their kids, which I can’t do when I’m tied up on the phone with one of their parents.
Tell a little bit about yourself.  You don’t need your entire life story, but families enjoy knowing a little bit about you and who you are as a person.  Maybe include a family photo or two.  Again, don’t share more than you’re comfortable with.  I also recommend to word your information in such a way that it doesn’t become out of date quickly.  For example, instead of saying I have a 2-year old son, I might say my son was born in 2014 or just skip his age/year altogether.
Finally, include information about your class.  At the secondary level, this is likely a syllabus or course outline.  For younger students, this might include a curriculum map or an outline of the majors units of study for that grade level.  You don’t need every single assignment or lesson here, just the big picture so parents have a rough idea of what’s coming.
Have some extra time?  I know, probably not, right?  Well, if you want to include a few more pieces of information, here are some of my “nice to have” extras you might think about including on your site.  Remember, some of these are only useful if you keep them updated regularly.  If you can’t commit time to do that, don’t include them!
  • Additional resources or websites for students to practice skills at home
  • Student photo gallery (should be updated at least once per month)
  • Student work examples (should be updated at least once per month)
  • Resources for students to use in class (handouts, assignments, links to websites, etc.)
  • Daily or weekly homework
  • Daily class agendas
  • Daily/weekly class blog
I’ve created a handy infographic to help you out:Teacher Websites
If you need some help working on your website, check out the tutorials here:
Google Sites Cheat Sheet

Evolution of the Desk

This is an interesting video that shows the evolution of the desk from the early 1980s to present day.  Imagine how different it could look in another 30 years...


Thanks, Dan Voce for sharing this me!

Content by BestReviews 

Guided Access on iPads

Have you ever used iPads with your students and caught them using a different app than what you asked them to use? Frustrating, right? Wouldn't it be nice if you could keep them in the app you wanted in the first place? Oh wait, you can!

The iPad has all kinds of tricks and hidden gems built in to make life easier for its users. One of them is called Guided Access and what it does, among other things, is lock the iPad into a particular app. It's not exactly straightforward to find and turn on, but with a little digging, it can make classroom management with many iPads much simpler!

Guided Access is hidden in the accessibility settings. To find it, follow these steps:
  • Go to the Settings menu.
  • From there, click General.
  • Click Accessibility (there are actually several features here you might want to check out, but we'll move ahead for now).
  • Scroll down to Guided Access (near the bottom).

  • Tap the switch to turn on Guided Access.

  • Then click Passcode settings. (You will need to create a passcode if you don't already have one. This is what you will need to exit Guided Access when your students are done working. Be sure you keep track of the passcode!)

You're all set! To activate Guided Access, enter the app you'd like students to use and then triple-click the home button. The window will shrink a bit and you will see the Guided Access controls appear on the screen. Click Start at the top right corner and Guided Access will be activated.


Now when your students use the iPads and try to back out of an app, it won't work. They also can't double-click the home button to scroll between open apps. When you're done using that app, triple-click the home button to reveal the Guided Access controls again. From there, you can either end or resume Guided Access. You can also use the Guided Access menu to turn off access to particular parts of the screen. This can be helpful if their are buttons you don't want your students to bump accidentally. Remember, Guided Access has to be turned on each time you enter an app!

Google Drive: Collaborate or Copy?

Most people will admit that the introduction of Google Drive and its collaborative features, has been a game changer in the world of education.  Gone are (or should) be the days of emailing documents back and forth only to be working on outdated copies and trying to sort through multiple versions to find the “right” one.
The ability to share documents and other files with colleagues and students with just a few clicks is amazing.  We can work together on a single document in real time without having to crowd around a computer screen.  Participants can add to a meeting agenda without needing to email the items to the organizer.  Teachers don’t need to photocopy documents or manage hundreds of emails from students (particularly if they use Google Classroom).
Sometimes, however, collaboration on a document can be problematic.  Sometimes we want to share something with a colleague, but we still need to keep our original.  We remind them to make their own copy (which they can do), but they often forget and just start editing away.  This causes some teachers to revert back to old methods of emailing a document so they make sure their work doesn’t disappear.
But there is a little trick!  Did you know that you can force someone to make a copy of your document?  By making a small change to the URL of the document, the recipient will see a screen like this:Screen Shot 2016-03-16 at 10.26.20 AM
Clicking the “make a copy” button will automatically create a copy of the document in THEIR Google Drive.  Your document is intact and you’ve still shared your work with others.
How do you do it?  It’s actually pretty simple.
  1. Open a Google Doc (actually any Google file type should work).
  2. In the address bar, you should see a URL that begins with https://docs.google.com…
  3. Somewhere relatively near the end of the address, you should see the word edit (it may be followed by additional words or characters).
  4. Delete the word edit AND everything that follows it.
    Untitled drawing (2)
  5. At the end of the address, now add the word COPY.Untitled drawing (3)
  6. Highlight the entire address, and copy/paste it into an email that you send to anyone who needs the link.  When they click it, they will see the screen above.
So now you have the choice: collaborate or copy.  Both serve very useful functions in different situations.  For example, any time a group of teachers will need to have access to the SAME document, they will want to share the document with the group and edit on the same document.  Any time I’m sharing a document outside my organization, such as at conference or with Twitter friends, I tend to force the copy.  There are times, though, that I still use the force copy feature with colleagues within my district.
One example would be when you have created an assignment, assessment or template that you’d like to be able to share with your team.  In this case, if it’s important for every student to do the exact same assignment, you would want to share.  If you want each teacher to get the document but be able to customize it, you might want to choose force copy instead.
Again, both ways are helpful, so choose what works for you in your particular situation!

iPad Full of Photos? Send them to Google Drive!

Photos and videos can be a powerful tool for students and teachers.  But getting photos from place to place can be tricky.  It used to be the only way to move photos from your iPad to your computer was to email them a few at a time.  It took forever!  Not a good use of any teacher's time!

Many teachers find themselves with very full iPads. Often, this is because they and their students are documenting their learning through photos.  Pretty soon, though, the iPad is full but we still want to keep those pictures.

Your iPad has limited storage, but your Google Drive does not.  You can now easily move photos from you iPad device to your Google Drive, where you can store as many photos as you need.  Once the photos are uploaded, you can delete them from your iPad and free up much needed space.

Teachers can opt to do this in one of two main ways: manually or automatically.  Now, you might be asking why I would even mention a manual option when it can be done automatically.  I like teachers to have options that meet the needs of their workflow.  If you have students taking photos, you may want to go through them before they end up in your Drive, so you'd rather upload photos as needed (Manual).  Or maybe you'd prefer an automatic solution and you'd like to go through the photos on your computer instead (Automatic).  No right or wrong answer here because both will accomplish what we need to do.

I have created directions for performing both options (click each option to go to the larger version):

Manual Uploading

Automatic Uploading

You can also view these and other iPad tips at the Tiger Tech Tips page!  Please contact the instructional technology department if you need more support or have questions!

Our First Mystery Skype Adventure

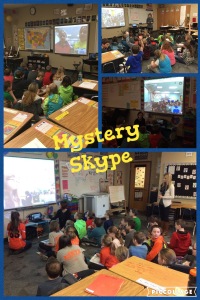
A little over a week ago, a member of my PLN (Thanks, @korytellers!) threw out a tweet saying she was looking for a few more classes to participate in Mystery Skype. What is Mystery Skype? Basically, two teachers connect their classes digitally (most use Skype but some also use Google Hangouts). By asking a series of yes or no questions, the two classes have to determine where the other one is located.  In this case, both classes were in the United States, so we had students narrow it down to the state the other group lived in, though I believe some narrow it down to the particular city.

So, since I don't have a class of students of my own, I sent an email to my teachers in my district.  Within 24 hours, I had four teachers on board and ready to play!  After figuring out some technical issues (the computer in the back of the room and the SmartBoard in the front of the room), I set up time to meet with each class ahead of time to teach them how to play.

I handed each student a labeled map of the United States with the regions of the United States labeled on the back.  Then we brainstormed a list of questions we might ask to solve the mystery quickly.  Early questions that didn't give us much information (such as, "Are you in Montana?") soon gave way to much more specific and inclusive questions (like "Are you in the IMG_7842southeast region?".  Students had to really think critically about the questions they asked in order to get the best information possible.

To make sure they were really ready, we played a practice game with one half of the class challenging the other.  Since we couldn't both use our home state, each group secretly chose a new state (and of course, chose some tiny state in New England to make it as difficult as possible for the other group).  As they asked each question, they marked off states on their maps which were off the list of possibilities.  They had a lot of fun working together to figure out the answers!

When it was time for the real thing, we took turns asking Mrs. Graham's classes yes or no questions to figure out where they were.  And wouldn't you know it, but they were right here in Minnesota!  Mrs. Graham's students told us a little bit about their school and community and we did the same as well.  Both groups were absolutely floored to find out that both schools do coding in their technology/innovation classes AND both schools are building new primary schools right next door!  What a coincidence!

I had a blast getting to work with these students and they really enjoyed solving the mystery.  I can't wait to try it again with classes from another state!  Thanks to Melissa Kisch, Jodi Burling, Erin Franson, and Michelle Ford for volunteering for this first round!  If you are interested in connected with a class for a Mystery Skype, let me know!

Google Drive Migration Update

Over the past few months, staff members across the district have been working to move their computer files to their Google Drive for storage.

For those of you who have already started (or finished) this process, here are a few reminders that may help:

  • If you are using non-Google files (Microsoft Word/Powerpoint/Excel, Smart Notebook, GarageBand, etc.), those must be opened using the Drive folder and not your internet browser.  If you use the browser, you will always be prompted to download a copy.
  • You can create folders and organize your files in either the browser or the Drive folder on your computer.
  • You can save files directly to your Google Drive (rather than to your desktop and having to move them later).
There is also a guide on the Tiger Tech Tips website to help anyone working through the migration process (view the guide here).

If you still need help or have questions, contact a building technology coach or the technology department.

The New "Ask 3 Before Me"?

When I was in the classroom, I had a rule: ask three before me.  Several of my colleagues had a similar rule.  The basic premise was that students shouldn't come ask the teacher about every single question they had.  The goal was so that students would learn to search for the answer for a bit themselves rather than just defaulting to asking the teacher right away (and honestly, saved the teacher time because there's no way one person can answer every single question from 25 inquisitive kindergarteners in one class period!).
My goal as an educator has always been to help my students become independent learners; ideally, they shouldn't need me at some point if I've done my job well.  But in 2016, I wonder if we need to take this a step further. I've heard many complain about a sort of "learned helplessness" among today's youth, a lack of any real knowledge or skill.  I'll admit that I fall into that category sometimes myself.  There are many things that my parents and grandparents know how to do that I have no clue about, such as changing my own oil or canning vegetables.
Yet in many ways, I am much more adept than my elders at figuring out how to solve new problems.  Take even a simple example: my mother plays a word game on her iPhone. When she gets stumped, she texts me and asks for a hint. For awhile I would help her, but after awhile I got tired of the game and couldn't help her anymore. Instead, I taught her how to do a Google search to find hints and answers. It would have never occurred to her that such a thing even exists (I also showed her on YouTube that some people create videos of the solutions in case she really gets stuck).
Teachers sometimes bemoan the fact that today's students may never know what it's like to have to look up something in an actual dictionary or encyclopedia. While there's something to be said for valuing traditions, when was the last time you picked up a volume of an actual bound copy of an encyclopedia to look for an answer? I bet you Googled it or looked on Wikipedia.  Need to learn a new skill?  You might take a class, or better yet, search for it on YouTube.  Need recommendations for a restaurant?  Visit UrbanSpoon.com or put out a request on social media to get several within hours if not minutes.
So, I propose a new "Ask 3 Before Me" based on this image:
Image by Heather Dowd (@heza)
Notice the teacher is not on the list.  But fear not.  Just because you're not on the list doesn't mean you're not important.  Students need to use collaboration, communication, critical thinking, and sometimes even creativity (together known as the 4 C's of 21st Century learning) to be able to do any of this.  That's where we come in.  These "new" skills are so fundamental to our students' future success that we don't dare send them into the real world without them.
I challenge you to think about this for a bit: how might your classroom look different if you go in with the assumption that students will forever have access to Google (or its someday replacement)?  What do they need to know and do?  What no longer seems important?

Want to keep track of things? Try Google Keep!

It seems like there is a never-ending stream of information for teachers, staff, and students to keep track of.  You write it down, but then that post-it note falls off your computer. Or you can't remember where you saved a file with some important info.

One possible solution is Google Keep.  It allows you to create notes that look like sticky notes, but with so much more power!  Here are a few great features you might like:

  • Title your notes
  • Choose a note color to keep yourself organized
  • Add a note reminder
  • Search your notes for any words in the title or body of the note
  • Share notes with colleagues
  • Tag notes with keywords (which allow you to pull up all notes with that tag)
  • Add images to your notes
  • Copy a note to a Google Doc if you need to do more work with it
  • Can access on mobile devices (iOS and Android) or on the web
Use them with your PLC to have shared notes with reminders.  Use different colored notes to keep track of different things (students, parents, PLC, grade level, etc.).  Collect information or data on students and tag with the student's name to find quickly.  Keep track of teaching resources, websites, etc. that you need to reference later and tag by subject or standard. The possibilities are endless!


To check it out, view the video below or visit https://keep.google.com/.


Use Plickers? Get Ready for Scoresheet!

If you already use the app Plickers, you probably love how you can get instant feedback from your students while only needing one device.  What you probably don't love is how you can't get data for more than one question at a time.  Well, not anymore! Plickers hass introducing a new feature: Scoresheet! Scoresheet will allow teachers to view student answers across multiple questions, making it much easier for teachers to see problem areas in teaching or students who might need a bit more help.

Read more about it here:  http://blog.plickers.com/introducing-plickers-scoresheet/

Free Mindset Videos for Kids From Class Dojo

Teachers in Princeton Public Schools are no stranger to the idea and importance of mindset, both in students and in staff.  Many teachers are even incorporating the idea of mindset into their teaching, specifically teaching students about mindset and how it applies to them as learners.  The makers of the Class Dojo app have just come out with a video series teaching students all about mindset.

There are five videos in the series; the first two videos ("A Secret About the Brain" and "Mistakes are Magic") are already out, and the remaining videos come out over the course of the next few weeks.  The videos are definitely geared toward younger learners, but they are relatively short and easily incorporated into a classroom discussion.  There is even a discussion guide for teachers, including a short take-home piece for students to share with parents and families (including a link to the video if they'd like to watch themselves).

View the Class Dojo videos here!